
Hello folks!! If you are learning Hadoop and Apache
Spark, you will need some of infrastructure. You can do a lot on your local
machines or try things in a VM. But
sooner or later, you will realize following problems. You have limited
resources and all you can do is to create a single node or a standalone
environment. But you want to learn more on a real multi-node cluster. Installation
and setup of Hadoop and Spark is a tedious and time-consuming process. As an
alternative, you can download a ready to use VM image, but they don't offer you
a multi-node cluster. In this post, we will set up a four-node Hadoop and Spark
cluster. It will do it in less than two minutes. We are assuming that you
already have GCP account and created a project.
So Let’s start …..
Google offers a managed Spark and
Hadoop service and they call it Google Cloud DataProc.
It is almost same as Amazon's
EMR. You can use DataProc service to create a Hadoop and Spark
cluster in less than two minutes.
Let me show you step
by step process:
1.
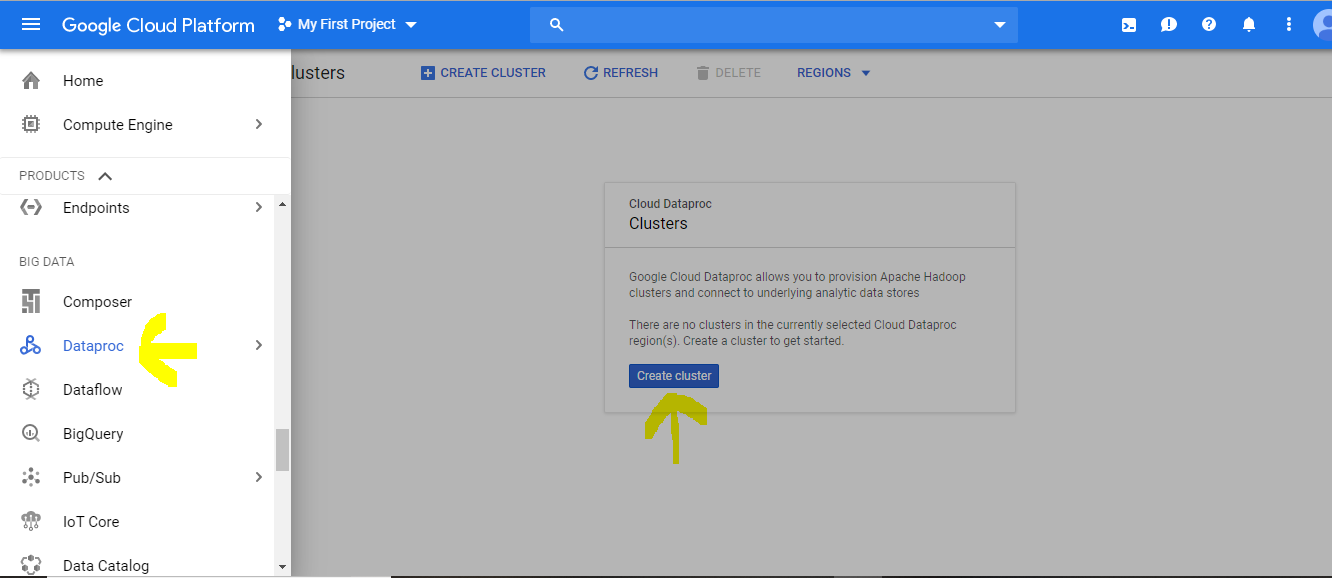
Now, start your Google Cloud Console.
2.
Go to products and services menu.
3.
Scroll down to Data Proc and select clusters.
4.
Hit the create cluster button.
5.
Give a name to your Cluster.
6.
Choose your region. The default selection is
global.
7.
Choose a machine type for your master node.
Note:
v We don't want our
cluster to spread across the globe. I want to limit all my nodes in a single
region and a single zone. That keeps the cost low.
v With your free GCP
account, you cannot have more than eight concurrent CPU cores. The paid account
doesn't have such limits. But eight CPU cores are good enough for us. I will
give two CPU cores to the master node.
8.
The next option is to select a cluster mode.
We have three choices.
1.
A single node cluster.
2.
A standard multi-node cluster. This guy comes
with no High Availability.
3.
A High Availability multi-node cluster, this
option will create three master nodes and enable High Availability.
We will go with a standard multi-node cluster.
9.
Let's
reduce the disk size to 32 GB. That's enough for us.
10.
Now,
let's choose the data node configuration. we will pick up a single CPU
for each worker. Let's take three workers. Reduce the disk size to 32 GB for
each worker.

Great. 😊
This
configuration gives us, a four-node Hadoop cluster. One master and three workers.
You can hit the create button, and the Data Proc will launch a four-node
cluster in less than two minutes.
Before
creating the cluster, I want to configure a Jupiter notebook as well. So, let
me expand this part. We keep all the defaults.
Now I am going
to click on “Advanced options”. Do you see this option?
The image version.
The latest image version as on date is 1.4. What does that mean? The Data Proc
1.4 comes with Spark 2.4.3 and Hadoop 2.9.2, that's the most recent version of
Spark and Hadoop. The Google Data Proc team is quick enough to make the latest
versions available for your exploration. If you need an older version of Spark,
you can choose an older Data Proc version.
Dataproc versions:

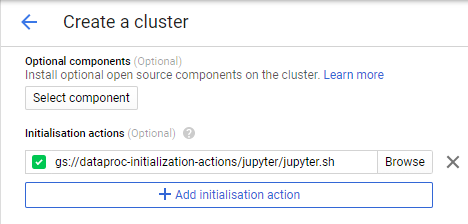
Now come to
initialization actions section. The initialization action allows us to install
additional components on this cluster. You need to supply a script for that.
You can create your own script, but the good thing is that the Data Proc team
has already prepared many of them. Here is the list.
open Cloud
Shell types the following commands:
gsutil ls gs://dataproc-initialization-actions/

You can get
Apache Drill, Flink, Jupyter, Kafka, presto, Zeppelin and much more. We will
use jupyter.sh.
gsutil ls gs://dataproc-initialization-actions/jupyter

copy the
jupyter.sh file directory path and paste it into initialization actions section.
Good. Let's
hit the create button.
Wait for a
minute or two, and the Data Proc API will provision your cluster.
Amazing 😊.
Isn’t it. No downloads, No installation, nothing. Your cluster is ready in just
one click.
We used Cloud Console UI to create this cluster, but
you can use Cloud SDK to create a script and launch it by just executing a
script file from your local machine. You can also achieve the same results
using Rest based APIs. The SDK and the APIs are the primary tools for
automating things in Google Cloud. I will cover them some other day. Now the
next part of it. How to access and use this cluster. I would want to do at
least two things. SSH to one of the nodes in this cluster and access Web-based
UIs. For example Resource manager UI and my Jupyter notebooks. The first part
is simple. Click on the cluster, and you should be able to see the list of VMs.
This one is the hostname of my master, and these are the worker nodes. You can
ssh to the master node. In fact, if you check your dashboard, you will see your
VMs. You can ssh to any of these VMs. You may not want to do that, but the GCP
doesn't stop you from accessing your VMs.
Let's ssh to the
master node.
These VMs are Debian so your CentOS or Redhat
specific commands may not work. But that shouldn't be a problem. Right. You can
access HDFS. You can also start Spark shell. You can submit a spark job too. I
will be using this cluster in many of my Spark tutorial videos. Now the next part. How to access Web Based
UIs. All such UIs are available on different ports. For example, RM is
available on 8088 and Jupyter is available on 8123. I have an option to create a firewall rule and
open these ports. But I don't want to do that. Because these services are not secure,
and I don't want to open several ports for attackers. Right. There is another
easy alternative. SSH tunnel. It's a two-step process. We can create an SSH
tunnel to the master node. And then configure your browser to use SOCKS proxy.
The proxy will route the data from your browser through the SSH tunnel.
Let's do it.
The first thing is to install Google Cloud SDK.
The link to download the SDK is available in the documentation. Start the
installer and follow the on-screen instructions. The Installer automatically
starts a terminal window and runs an init command. It will ask you for your GCP
account credentials and the default project name. Once you have the SDK, you
should be able to use gcloud and gsutil command line tools. Ok, we wanted to
create an SSH tunnel. Start a terminal and use this command. The command gcloud
compute ssh will open a tunnel from port 10000 on your local machine to the GCP
zone us-east1-c and the GCP node spark-6-m. You can change the zone name and
the master node name based on your cluster setup. The -D flag is to allow
dynamic port forwarding and -N to instruct gcloud to not to open a remote
shell.
The tunnel is open. Minimize
these windows. The next step is to start a new browser session that uses the
SOCKS proxy through this tunnel. Start a new terminal. Start your browser using
this command. I am starting chrome.exe with this URL. This URL is for my YARN
Resource Manager. Next one is the proxy server. It should use the socks5
protocol on my local machine's port 10000. That's the port where we started the
SSH tunnel. The next flag is to avoid any DNS resolves by chrome. Finally, the
last option is a non-existent directory path. This option allows chrome to
start a brand-new session. Great. You can access the resource manager. It shows
that one application is already running on this cluster. You can access your
jupyter notebook by changing the port number to 8123. You can create a new
Notebook. It doesn't offer Scala Notebooks because we haven't configured Apache
toree or some other equivalent kernel. But I think that's fine. You can start PySpark
at least. You have the cluster. You can access it over the web and SSH. Execute
your Jobs, play with it and later go back to your Dataproc clusters list and
delete it. We don't have an option to keep it there in shutdown state. Creating
and removing a cluster is as simple as few clicks. You can create a new one
every day, use it and then throw it away.
You might be wondering about your data. If I
delete a cluster, what happens to my data. Well, If you stored it in HDFS, you
lose it. Keeping data outside the HDFS allows you to create a cluster as and
when you need it. and delete it when you are done with the compute workload. That's
a fundamental architectural difference in elastic clusters and persistent
clusters. Even if you are using Amazon's EMR, you don't keep data in HDFS. You
would be keeping it in S3 or somewhere else. In case of Google DataProc, you
have many options. If you have a data file, you will keep it in GCS Bucket. The
Google Cloud Storage Bucket. Let's leave GCS Bucket for another post.
Thanks for this amazing post! Thank you so much for sharing the good post, Keep blogging.
ReplyDeleteGCP Training Online
Online GCP Training